PS5 Controller Motherboard- Complete Guide to Replacement, Compatibility, Repair & Troubleshooting
The PS5 Controller Motherboard is the core internal component of the DualSense controller, responsible for controlling every function including buttons, analog sticks, charging, vibration, and connectivity. When the motherboard gets damaged, users may face issues like stick drift, charging failure, or complete controller malfunction. This guide explains PS5 controller motherboard versions, common problems, replacement steps, tools, compatibility, and troubleshooting in a simple way so you can understand repair or replacement without confusion or unnecessary cost.
Learn about PS5 controller motherboard, its problems, versions, replacement process, and repair tips in this complete easy guide.
- What Is a PS5 Controller Motherboard?
- How the Motherboard Works in DualSense Controller
- Common PS5 Controller Motherboard Problems
- Signs Your PS5 Controller Motherboard Needs Replacement
- PS5 Controller Motherboard Versions Explained
- How to Identify Your Motherboard Version
- Tools Required for PS5 Controller Motherboard Replacement
- Step-by-Step PS5 Controller Motherboard Replacement Guide
- Troubleshooting After Replacement
- Compatibility Considerations
- Repair vs Replacement: Which Is Better?
- PS5 Controller Motherboard Replacement Cost
- Maintenance Tips for Longer Life
- Frequently Asked Questions
- Conclusion
- Related post
What Is a PS5 Controller Motherboard?
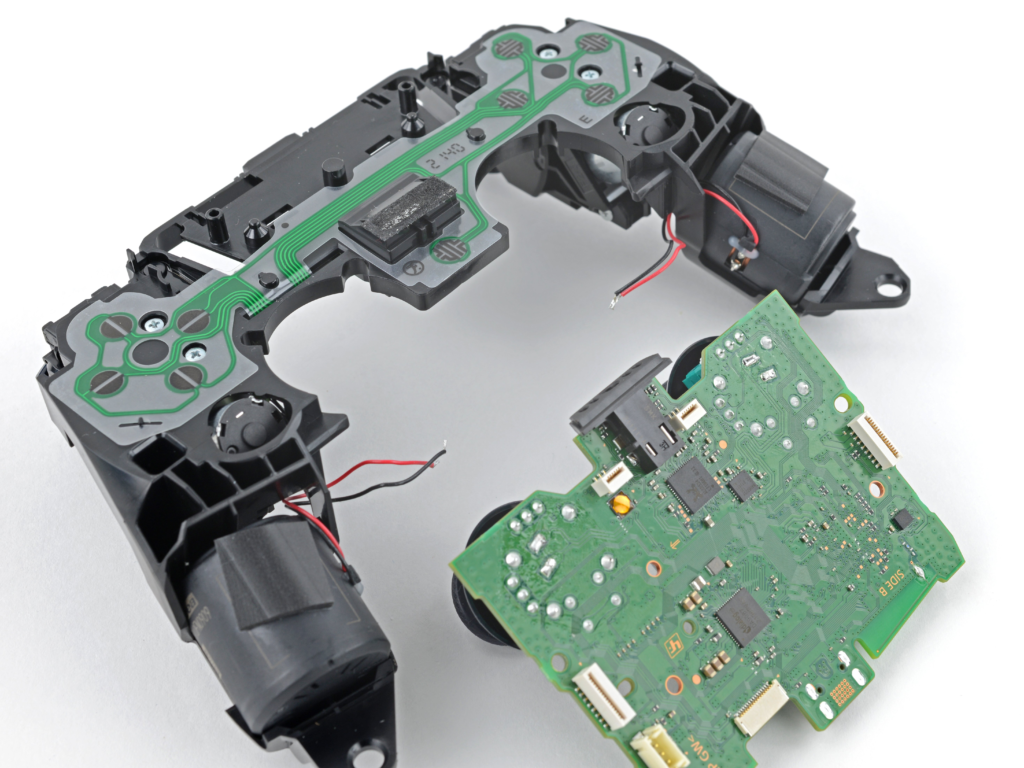
The PS5 controller motherboard is the main circuit board inside the DualSense controller. It acts as the central hub that connects all internal components and processes every input from the user.
It controls:
- Analog sticks
- Buttons
- Touchpad
- Battery system
- Charging port
- Bluetooth connection
- Vibration motors
When you press any button or move an analog stick, the motherboard converts that action into a digital signal and sends it to the PS5 console. Without a working motherboard, the controller cannot function properly.
How the Motherboard Works in DualSense Controller
The motherboard works like the brain of the controller. It continuously manages communication between hardware components and ensures smooth gameplay performance.
It handles three main tasks:
1. Input Processing
It detects button presses and joystick movements instantly.
2. Power Management
It distributes battery power efficiently to all components.
3. Wireless Communication
It connects the controller to the PS5 using Bluetooth technology.
If any part of the motherboard is damaged, the controller may lag, disconnect, or stop working completely.
Common PS5 Controller Motherboard Problems
A faulty motherboard can create multiple issues at once. These problems often look like joystick or button defects but are actually caused by internal circuit failure.
Common issues include:
- Stick drift or unstable analog movement
- Controller not charging properly
- Bluetooth disconnection
- Random input delays
- Buttons not responding
- Vibration not working
- Complete power failure
Water damage, drops, or electrical faults are the most common reasons behind motherboard failure.
Signs Your PS5 Controller Motherboard Needs Replacement
You may need a replacement if:
- Controller does not turn on at all
- Charging port is damaged or loose
- Multiple functions stop working together
- Controller disconnects repeatedly from PS5
- Liquid damage has affected internal circuits
- Previous repair attempts failed
Before replacing the motherboard, always check the battery and charging cable to rule out simple issues.
PS5 Controller Motherboard Versions Explained
Different DualSense controllers use different motherboard versions. Each version has small design improvements.
| Version | Description |
| BDM-010 | First generation board |
| BDM-020 | Minor improvements |
| BDM-030 | Better internal design |
| BDM-040 | More stable performance |
| BDM-050 | Latest commonly used version |
Each version is not always fully compatible with others, so matching is very important.
How to Identify Your Motherboard Version
To identify your motherboard version:
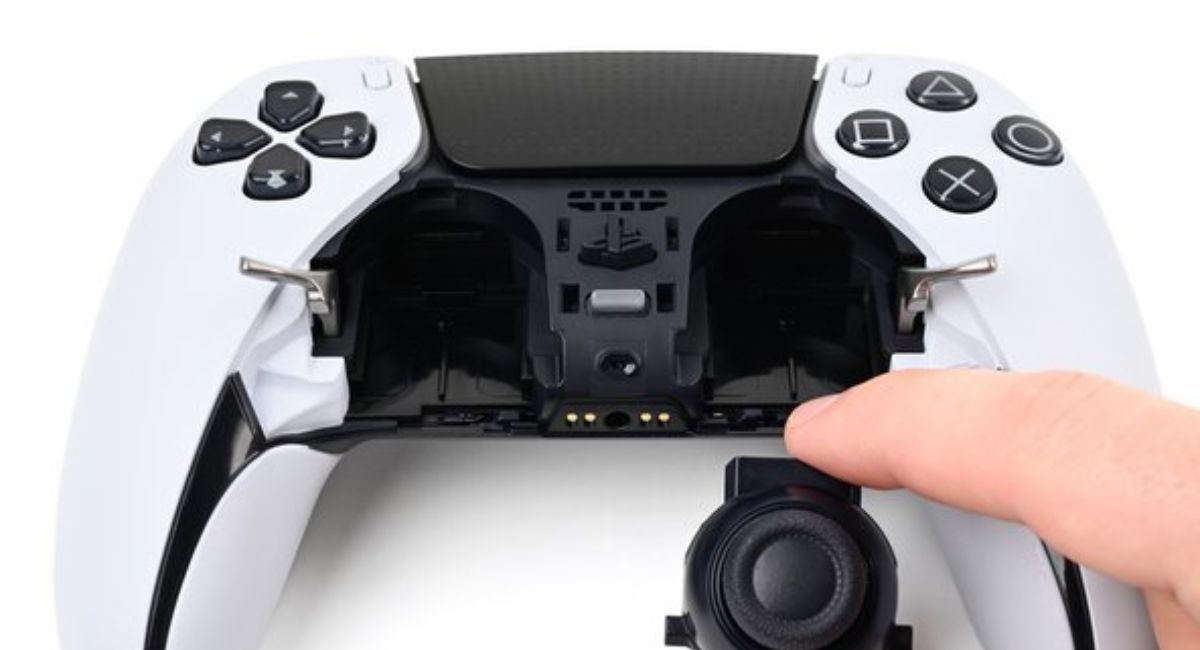
First, open the controller carefully using proper tools. After opening it, locate the printed code on the board, usually written as BDM-010, BDM-020, etc.
Then compare this code with the replacement board before purchasing. Using the wrong version may result in button failure, charging issues, or complete incompatibility.
Tools Required for PS5 Controller Motherboard Replacement
Before starting the repair, make sure you have the correct tools:
- Precision screwdriver set
- Plastic pry tool
- Tweezers
- Anti-static wrist strap
- Small container for screws
- Soldering kit (optional)
Using proper tools reduces the risk of damaging internal components.
Step-by-Step PS5 Controller Motherboard Replacement Guide
Step 1: Open the Controller
Carefully remove the outer shell using a plastic tool.
Step 2: Disconnect Battery
Always disconnect the battery first to avoid short circuits.
Step 3: Remove Internal Components
Detach ribbon cables, touchpad, and trigger assemblies carefully.
Step 4: Remove the Motherboard
Unscrew and gently lift out the damaged motherboard.
Step 5: Install New Motherboard
Place the new board in position and reconnect all cables securely.
Step 6: Reassemble Controller
Close the controller shell and test all functions.
Troubleshooting After Replacement
If the controller is not working properly after replacement, check the following:
- Bluetooth not connecting → re-pair controller
- Buttons not working → check ribbon cable connection
- Charging issue → inspect charging port alignment
- Stick drift still present → issue may be analog module, not motherboard
Most post-repair issues are caused by loose connections, not faulty parts.
Compatibility Considerations
Always ensure:
- Exact BDM version match
- Proper connector layout
- Compatible seller specifications
- Good-quality replacement board
Wrong compatibility can lead to full controller failure or partial functionality loss.
Repair vs Replacement: Which Is Better?
Repair is better when:

- Damage is minor
- Only one component is affected
- You have technical skills
Replacement is better when:
- Multiple functions fail
- Motherboard is heavily damaged
- Previous repairs failed
Replacement is usually more reliable for long-term use.
PS5 Controller Motherboard Replacement Cost
The cost depends on:
- Version (BDM-010 to BDM-050)
- Quality (original vs third-party)
- Seller and availability
Original boards cost more but offer better durability and performance, while cheaper boards may not last as long.
Maintenance Tips for Longer Life
To extend motherboard life:
- Avoid dropping the controller
- Keep away from liquid exposure
- Do not overcharge battery
- Use original charging cable
- Store in a dry, safe place
Proper care significantly reduces motherboard failure risk.
Frequently Asked Questions
1.Can I replace a PS5 controller motherboard myself?
Yes, but it requires basic technical skills, patience, and proper repair tools to avoid damaging internal components during the process.
2.Does motherboard replacement fix stick drift?
Not always. Stick drift is usually caused by worn or faulty analog stick modules, not the motherboard itself.
3.Are all PS5 controller motherboards compatible?
No, all motherboards are not compatible. Each version must match exactly with your controller model.
4.How long does replacement take?
A typical replacement usually takes around 1 to 2 hours for someone experienced in controller repair.
5.Is it worth replacing a PS5 controller motherboard?
Yes, it is worth it if the controller has major issues like power failure or multiple faults, as replacement can restore full functionality at lower cost.
Conclusion
The PS5 Controller Motherboard is the most important component inside the DualSense controller. It controls all major functions including input, connectivity, and power distribution. Understanding its versions, problems, and replacement process helps users make better repair decisions. With proper tools, correct compatibility, and careful handling, you can successfully replace or repair the motherboard and restore full controller performance while saving money and extending device life.